Add section theo alphabet trong RecyclerView
Đầu tiên, mình sẽ nói một ít về RecyclerView. Nếu các bạn đã từng sử dụng ListView rồi thì RecyclerView có thể hiểu là bản nâng cấp của ListView với performance tốt hơn với ViewHolder được implement sẵn trong Adapter và hổ trợ về layout nhiều hơn (scroll dọc, ngang), thêm vào đó RecylerView còn hổ trợ ItemAnimator cho phép thiết lập animation (khi xoá hay edit) một cách đơn giản hơn nhiều so với ListView.
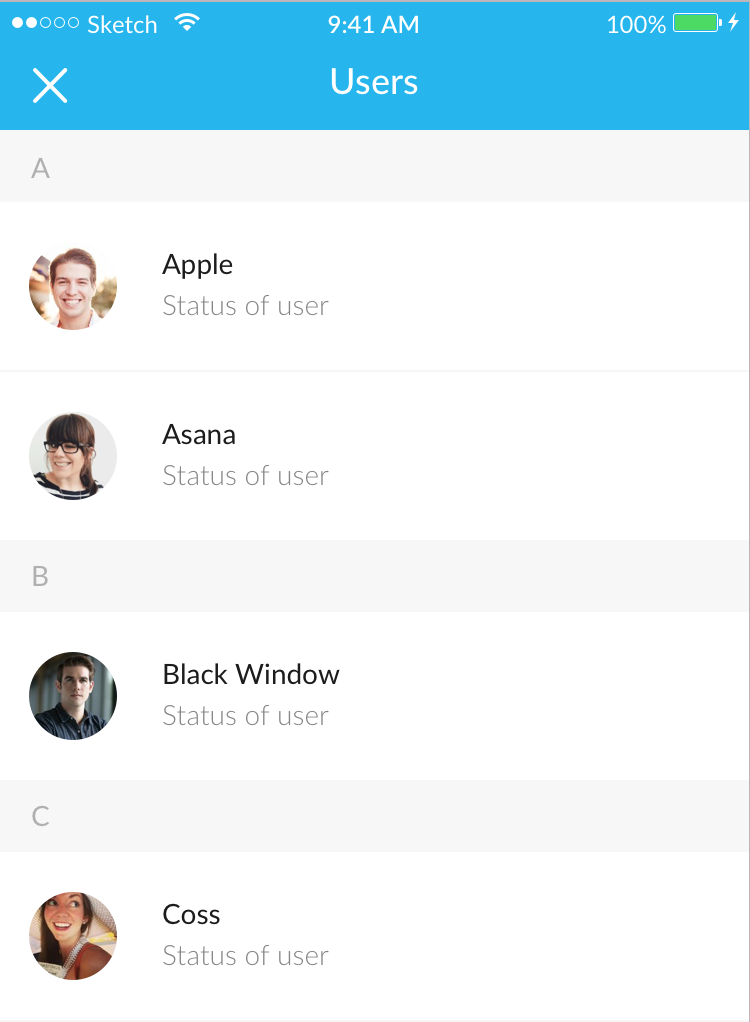
Trong bài viết này, mình sẽ giới thiệu cách mà mình thêm section chia theo alphabet như thế này:
1. Import thư viện cần thiết
Đầu tiên là Import RecyclerView vào android studio, các bạn vào gradle.build (app) trong dependencie và paste dòng code dưới đây vào:
compile 'com.android.support:recyclerview-v7:23.0.0'
Tiếp theo là Import CircleImageView (để tạo avatar tròn). Các bạn add dòng này vào:
compile 'de.hdodenhof:circleimageview:1.3.0'
Sau đó, các bạn bấm Sync Now để android studio tự download và nạp thư viện.
2. Layout Item trong RecylerView
Như các bạn thấy, mỗi Item bao gồm một Avatar, tên và status cua họ. và đầu mỗi danh sách là một header chữ cái đầu tên của người đó. Mình vẽ layout như sau:
//user_item.xml
<?xml version="1.0" encoding="utf-8"?>
<LinearLayout xmlns:android="http://schemas.android.com/apk/res/android"
    android:layout_width="match_parent"
    android:layout_height="wrap_content"
    android:orientation="vertical"
    >

    <TextView
        android:layout_width="match_parent"
        android:layout_height="36dp"
        android:paddingLeft="16dp"
        android:background="#f7f7f7"
        android:paddingTop="10dp"
        android:textColor="#b0b0b0"
        android:textSize="14sp"
        android:id="@+id/mSection"/>

    <LinearLayout
        android:layout_width="match_parent"
        android:layout_height="84dp"
        android:paddingTop="20dp"
        android:paddingLeft="15dp"
        android:background="@drawable/border_line"
        android:orientation="horizontal">

        <de.hdodenhof.circleimageview.CircleImageView
            android:layout_width="44dp"
            android:layout_height="44dp"
            android:id="@+id/mUserAvatar"
            android:src="@drawable/jennifer_lawrence_2"/>

        <LinearLayout
            android:layout_width="match_parent"
            android:layout_height="match_parent"
            android:orientation="vertical"
            android:layout_marginLeft="20dp">

            <TextView
                android:layout_width="wrap_content"
                android:layout_height="wrap_content"
                android:id="@+id/mUserName"
                android:textColor="#1c1c1c"
                android:textSize="14sp"
                android:text="Jennifer Lawrence"/>

            <TextView
                android:layout_width="wrap_content"
                android:layout_height="wrap_content"
                android:layout_marginTop="4dp"
                android:id="@+id/mUserStatus"
                android:textSize="14sp"
                android:textColor="#858585"
                android:text="Love my life"/>
        </LinearLayout>

    </LinearLayout>

</LinearLayout>
Trong mục drawable tạo border cho item:2.
<?xml version="1.0" encoding="utf-8"?>
<shape xmlns:android="http://schemas.android.com/apk/res/android"
    android:shape="rectangle">
    <stroke android:width="1dp" android:color="#f7f7f7"/>
    <solid android:color="#ffffff"/>

</shape>
3. Layout trong activity_main.xml
Trong activity_main.xml chúng ta gắn RecylerView vào:
<?xml version="1.0" encoding="utf-8"?>
<LinearLayout xmlns:android="http://schemas.android.com/apk/res/android"
    xmlns:tools="http://schemas.android.com/tools"
    xmlns:app="http://schemas.android.com/apk/res-auto"
    android:id="@+id/activity_users"
    android:layout_width="match_parent"
    android:layout_height="match_parent"
    android:orientation="vertical"
    tools:context="com.skylab.chatapp.UsersActivity">

    <android.support.v7.widget.RecyclerView
        android:layout_width="match_parent"
        android:layout_height="match_parent"
        android:id="@+id/mListUsers">

    </android.support.v7.widget.RecyclerView>

</LinearLayout>
4. Tạo Adapter
Đầu tiên mình tạo một class model users với 3 thuộc tính (Tên, Status, và Avatar):
public class Users {
    private String userName;
    private String userStatus;
    private String userAvatar;

    public Users() {
    }

    public Users(String userName, String userStatus, String userAvatar) {
        this.userName = userName;
        this.userStatus = userStatus;
        this.userAvatar = userAvatar;
    }

    public String getUserName() {
        return userName;
    }

    public void setUserName(String userName) {
        this.userName = userName;
    }

    public String getUserStatus() {
        return userStatus;
    }

    public void setUserStatus(String userStatus) {
        this.userStatus = userStatus;
    }

    public String getUserAvatar() {
        return userAvatar;
    }

    public void setUserAvatar(String userAvatar) {
        this.userAvatar = userAvatar;
    }
}
Tiếp theo là Adapter trong RecyclerView. Trong Adapter chứa class ViewHolder dùng để ánh xạ các View trong layout user_item. RecyclerView có performance tốt hơn ListView là nhờ class ViewHolder này, vì nó chỉ ánh xạ một lần, còn ListView là cứ dòng dữ liệu nào được tạo ra là phải ánh xạ lại (Thật ra ListView cũng làm được như vậy nhưng phải code tay chứ không tích hợp sẵn). Code của mình:
public class ListUsersAdapter extends RecyclerView.Adapter<ListUsersAdapter.ViewHolder>{

    ArrayList<Users> listUsers = new ArrayList<>();

    public ListUsersAdapter(ArrayList<Users> listUsers) {
        this.listUsers = listUsers;
    }

    @Override
    public ViewHolder onCreateViewHolder(ViewGroup parent, int viewType) {
        View v = LayoutInflater.from(parent.getContext()).inflate(R.layout.user_item, parent, false);
        return new ViewHolder(v);
    }

    @Override
    public void onBindViewHolder(ViewHolder holder, int position) {

    }

    @Override
    public int getItemCount() {
        return listUsers.size();
    }

    public static class ViewHolder extends RecyclerView.ViewHolder {

        private final CircleImageView mUserAvatar;
        private final TextView mUserName;
        private final TextView mUserStatus;
        private final TextView mSection;

        public ViewHolder (View v){
            super(v);
            mUserAvatar = (CircleImageView) v.findViewById(R.id.mUserAvatar);
            mUserName = (TextView) v.findViewById(R.id.mUserName);
            mUserStatus = (TextView) v.findViewById(R.id.mUserStatus);
            mSection = (TextView) v.findViewById(R.id.mSection);
        }

        public CircleImageView getmUserAvatar() {
            return mUserAvatar;
        }

        public TextView getmUserName() {
            return mUserName;
        }

        public TextView getmUserStatus() {
            return mUserStatus;
        }

        public TextView getmSection() {
            return mSection;
        }
    }
}
hàm onBindViewHolder(ViewHolder holder, int position)dùng để hiển thị dữ liệu (ở đây mình giả lập dữ liệu Avatar là một tấm hình có sắn trong drawable):
@Override
    public void onBindViewHolder(ViewHolder holder, int position) {
        Users users = listUsers.get(position);
        holder.getmUserName().setText(users.getUserName());
        holder.getmUserStatus().setText(users.getUserStatus());
        holder.mUserAvatar.setImageResource(R.drawable.jennifer_lawrence_2);
        holder.getmSection().setText(users.getUserName().substring(0,1));
    }
Nếu làm như vậy thì mỗi dòng dữ liệu của chúng ta, dòng nào cũng có 1 header với chữ cái đầu tên người đó và nó cũng không được sắp xếp theo alphabet. Do đó, mình sẽ thêm một hàm sort dữ liệu listUsers và gắn một hàm if() để xoá những cái header không cần thiết:
 @Override
    public void onBindViewHolder(ViewHolder holder, int position) {
        Collections.sort(listUsers, new Comparator<Users>() {
            @Override
            public int compare(Users o1, Users o2) {
                return o1.getUserName().compareTo(o2.getUserName());
            }
        });
        Users users = listUsers.get(position);
        holder.getmUserName().setText(users.getUserName());
        holder.getmUserStatus().setText(users.getUserStatus());
        holder.mUserAvatar.setImageResource(R.drawable.jennifer_lawrence_2);
        holder.getmSection().setText(users.getUserName().substring(0,1));
        if(position > 0){
            int i = position - 1;
            if (i < listUsers.size() && users.getUserName().substring(0,1).equals(listUsers.get(i).getUserName().substring(0,1))){
                holder.getmSection().setVisibility(View.GONE);
            }
        }
    }
5. Trong MainActivity
Trong main chúng ta tiến hành ánh xạ và setAdapter cho RecyclerView:
public class MainActivity extends AppCompatActivity {

    private RecyclerView mListUsers;
    private ArrayList<Users> listUsers;
    private ListUsersAdapter mListUsersAdapter;
    private RecyclerView.LayoutManager mLayoutManager;


    @Override
    protected void onCreate(Bundle savedInstanceState) {
        super.onCreate(savedInstanceState);
        setContentView(R.layout.activity_users);

        mLayoutManager = new LinearLayoutManager(this);

        listUsers = new ArrayList<Users>();

        //emulator data
        listUsers.add(new Users("BarryAllen", "Love my life", null));
        listUsers.add(new Users("Sara", "Love my life", null));
        listUsers.add(new Users("Jennifer", "Love my life", null));
        listUsers.add(new Users("Adam", "Love my life", null));
        listUsers.add(new Users("San", "Love my life", null));
        listUsers.add(new Users("Jim", "Love my life", null));
        listUsers.add(new Users("Cha", "Love my life", null));
        listUsers.add(new Users("Go", "Love my life", null));
        listUsers.add(new Users("Ao", "Love my life", null));
        listUsers.add(new Users("Bo", "Love my life", null));
        listUsers.add(new Users("Aoo", "Love my life", null));

        mListUsers = (RecyclerView)findViewById(R.id.mListUsers);
        mListUsersAdapter = new ListUsersAdapter(listUsers);
        mListUsers.setLayoutManager(mLayoutManager);
        mListUsers.setAdapter(mListUsersAdapter);


    }
}
Vậy là xong, chúng ta có một ContactList tương tự như trên (Lưu ý là trong code mình chưa có thiết lập toolbar nhé). Chúc các bạn thành công!!!
Nguồn tham khảo: https://developer.android.com/guide/topics/ui/layout/recyclerview.html.
HungNguyen